
Chapter 2 - ROS Fundamentals
IN THIS LESSON
You will learn the basic concepts of how to create a subscriber and publisher.
Nodes pass information in the form of string messages to each other over a topic. The simplest form of a ‘talker’ and a ‘listener’ system is used where one node publishes data to a topic and the other node subscribes to the topic to receive that data.
This is how you create a Publisher or a Subscriber.
In MiROS
Step 1: Click an existing package you created or create a new package to enter the Nodes Canvas.
Step 2: Drag a ROS element such as a Node or a Topic from the left Side Bar to the canvas.
Step 3: Drag the arrow button to draw a line connecting a Node and a Topic. You can now create either a Publisher, a Subscriber or both at the same time.
In Ubuntu (Linux)
This section of the tutorial will use python rather than CMake as the build system. Typically CMake is associated with C++ in ROS 2. First we will create a new package (as learnt in 1.3). Remember you must be in the ‘src’ directory, not the root of the workspace. Run the command:
ros2 pkg create --build-type ament_python py_pubsub
The terminal will return a message verifying the creation of the package ‘py_pubsub’ along with all the necessary files and folders which will be automatically generated.
Next, navigate into ros2_ws/src/py_pubsup/py_pubsub. This directory is a python package with the same name as the ROS2 package it is nested in. We will now use example code which will create a new file named ‘publisher_member_function.py’ adjacent to ‘__init__.py’.
The file contains the code on the right
The first lines of code import ‘rclpy’ so its ‘Node’ class can be used.
The next statement imports the built-in string message type that the node uses to structure the data that it passes on the topic. This is a very common import and more information about it can be found online, including what is included in this import. Another common import which will be useful to use with the Rosbots is geometry_msgs.
These lines represent the node’s dependencies. These must be added in the package.xml file which is located one directory higher in ‘ros2_ws/src/py_pubsub’. After the description, maintainer and license tags have been filled in, add the following dependencies corresponding to your node’s import statements:
<exec_depend>rclpy</exec_depend>
<exec_depend>std_msgs</exec_depend>
The next section of code creates the class ‘MinimalPublisher’ which inherits from (is a subclass of) Node. The node is named ‘minimal_publisher’ in this example. ‘create_publisher’ declares that the node publishes messages of type String (which was imported from the std_msgs.msg module) over a topic named ‘topic’. The queue size is 10. Queue size is a required setting which limites the amount of queued messages if a subscriber is not receiving them fast enough.
A timer is also created with a callback to execute every 0.5 seconds and ‘self.i’ is a counter used in the callback.
‘timer_callback’ creates a message with the counter value appended and publishes it to the console with ‘get_logger().info’.
Finally, the main function is defined where the rclpy library is initialised and the node is created. It then spins the node which allows the callbacks to be called (i.e. the node is continuously running).
With python packages, the setup.py file must be modified not only to match the maintainer, description and lisence fields of the package.xml file but also must describe the talker. This can be done by adding the following line within the ‘console_scripts’ brackets of the ‘entry_points’ field:
entry_points={
'console_scripts': [
'talker = py_pubsub.publisher_member_function:main',
],
},
Additionally, check the contents of setup.cfg file which should be correctly populated automatically with the following code:
[develop]
script_dir=$base/lib/py_pubsub
[install]
install_scripts=$base/lib/py_pubsub
which tells setuptools to put your executables in lib as ‘ros2 run’ will look for them there.
The package can now be built, ensure you source the local setup files and run them, and the publisher node should be fully working. To see the system at work properly let’s create the subscriber node.
Return to the ‘ros2_ws/src/py_pubsub/py_pubsub’ directory to create the next node, again using the following sample code:
The directory should now contain the following files:
__init__.py
publisher_member_funciton.py
subscriber_memeber_funciton.py
And the code in subscriber_memeber_funciton.py should be the one on the right:
The subscriber code is very similar to the publisher code. The imports are identical and the constructor creates a subscriber with the same arguments as the publisher. Recall that the topic name and message type used by the subscriber and publisher must match so they can communicate with each other.
There is no timer definition for the subscriber as the callback is called as soon as it receives a message. In this particular code the callback prints an info message to the console along with the data it received.
Note that if there are any additional dependencies/imports in the subscriber that differs to the publisher these must be added to package.xml and setup.cfg.
Setup.py must be altered to include the new listener (subscriber) entry point by inserting the following line below the talker (publisher’s entry point):
'listener = py_pubsub.subscriber_member_function:main',
The publisher subscriber system now is ready for use!
To build and run the new package ensure you are in the root of the workspace (ros2_ws in this example) before running the code:
colcon build --packages-select py_pubsub
Open a new terminal, source it and then navigate to the root of the workspace and run the talker node using:
ros2 run py_pubsub talker
The terminal will start publishing information every 0.5 seconds (time frame defined in code) and it should look like the following:
[INFO] [minimal_publisher]: Publishing: "Hello World: 0"
[INFO] [minimal_publisher]: Publishing: "Hello World: 1"
[INFO] [minimal_publisher]: Publishing: "Hello World: 2"
[INFO] [minimal_publisher]: Publishing: "Hello World: 3"
[INFO] [minimal_publisher]: Publishing: "Hello World: 4"
...
Open another terminal, source the setup files from inside ros2_ws again and then start the listener node using:
ros2 run py_pubsub listener
The listener will start printing messages to the terminal, starting at whatever message count the publisher is on at that time. An example is below:
[INFO] [minimal_subscriber]: I heard: "Hello World: 10"
[INFO] [minimal_subscriber]: I heard: "Hello World: 11"
[INFO] [minimal_subscriber]: I heard: "Hello World: 12"
[INFO] [minimal_subscriber]: I heard: "Hello World: 13"
[INFO] [minimal_subscriber]: I heard: "Hello World: 14"
To stop the nodes from spinning (to kill the nodes) enter Ctrl+C in each terminal.
Summary: two nodes were created (one to publish, one to subscribe to data over the same topic). The dependencies and entry points to the package was added in the config files.

Step 1: Click on a ROS Package labelled in Black to enter Nodes Canvas View
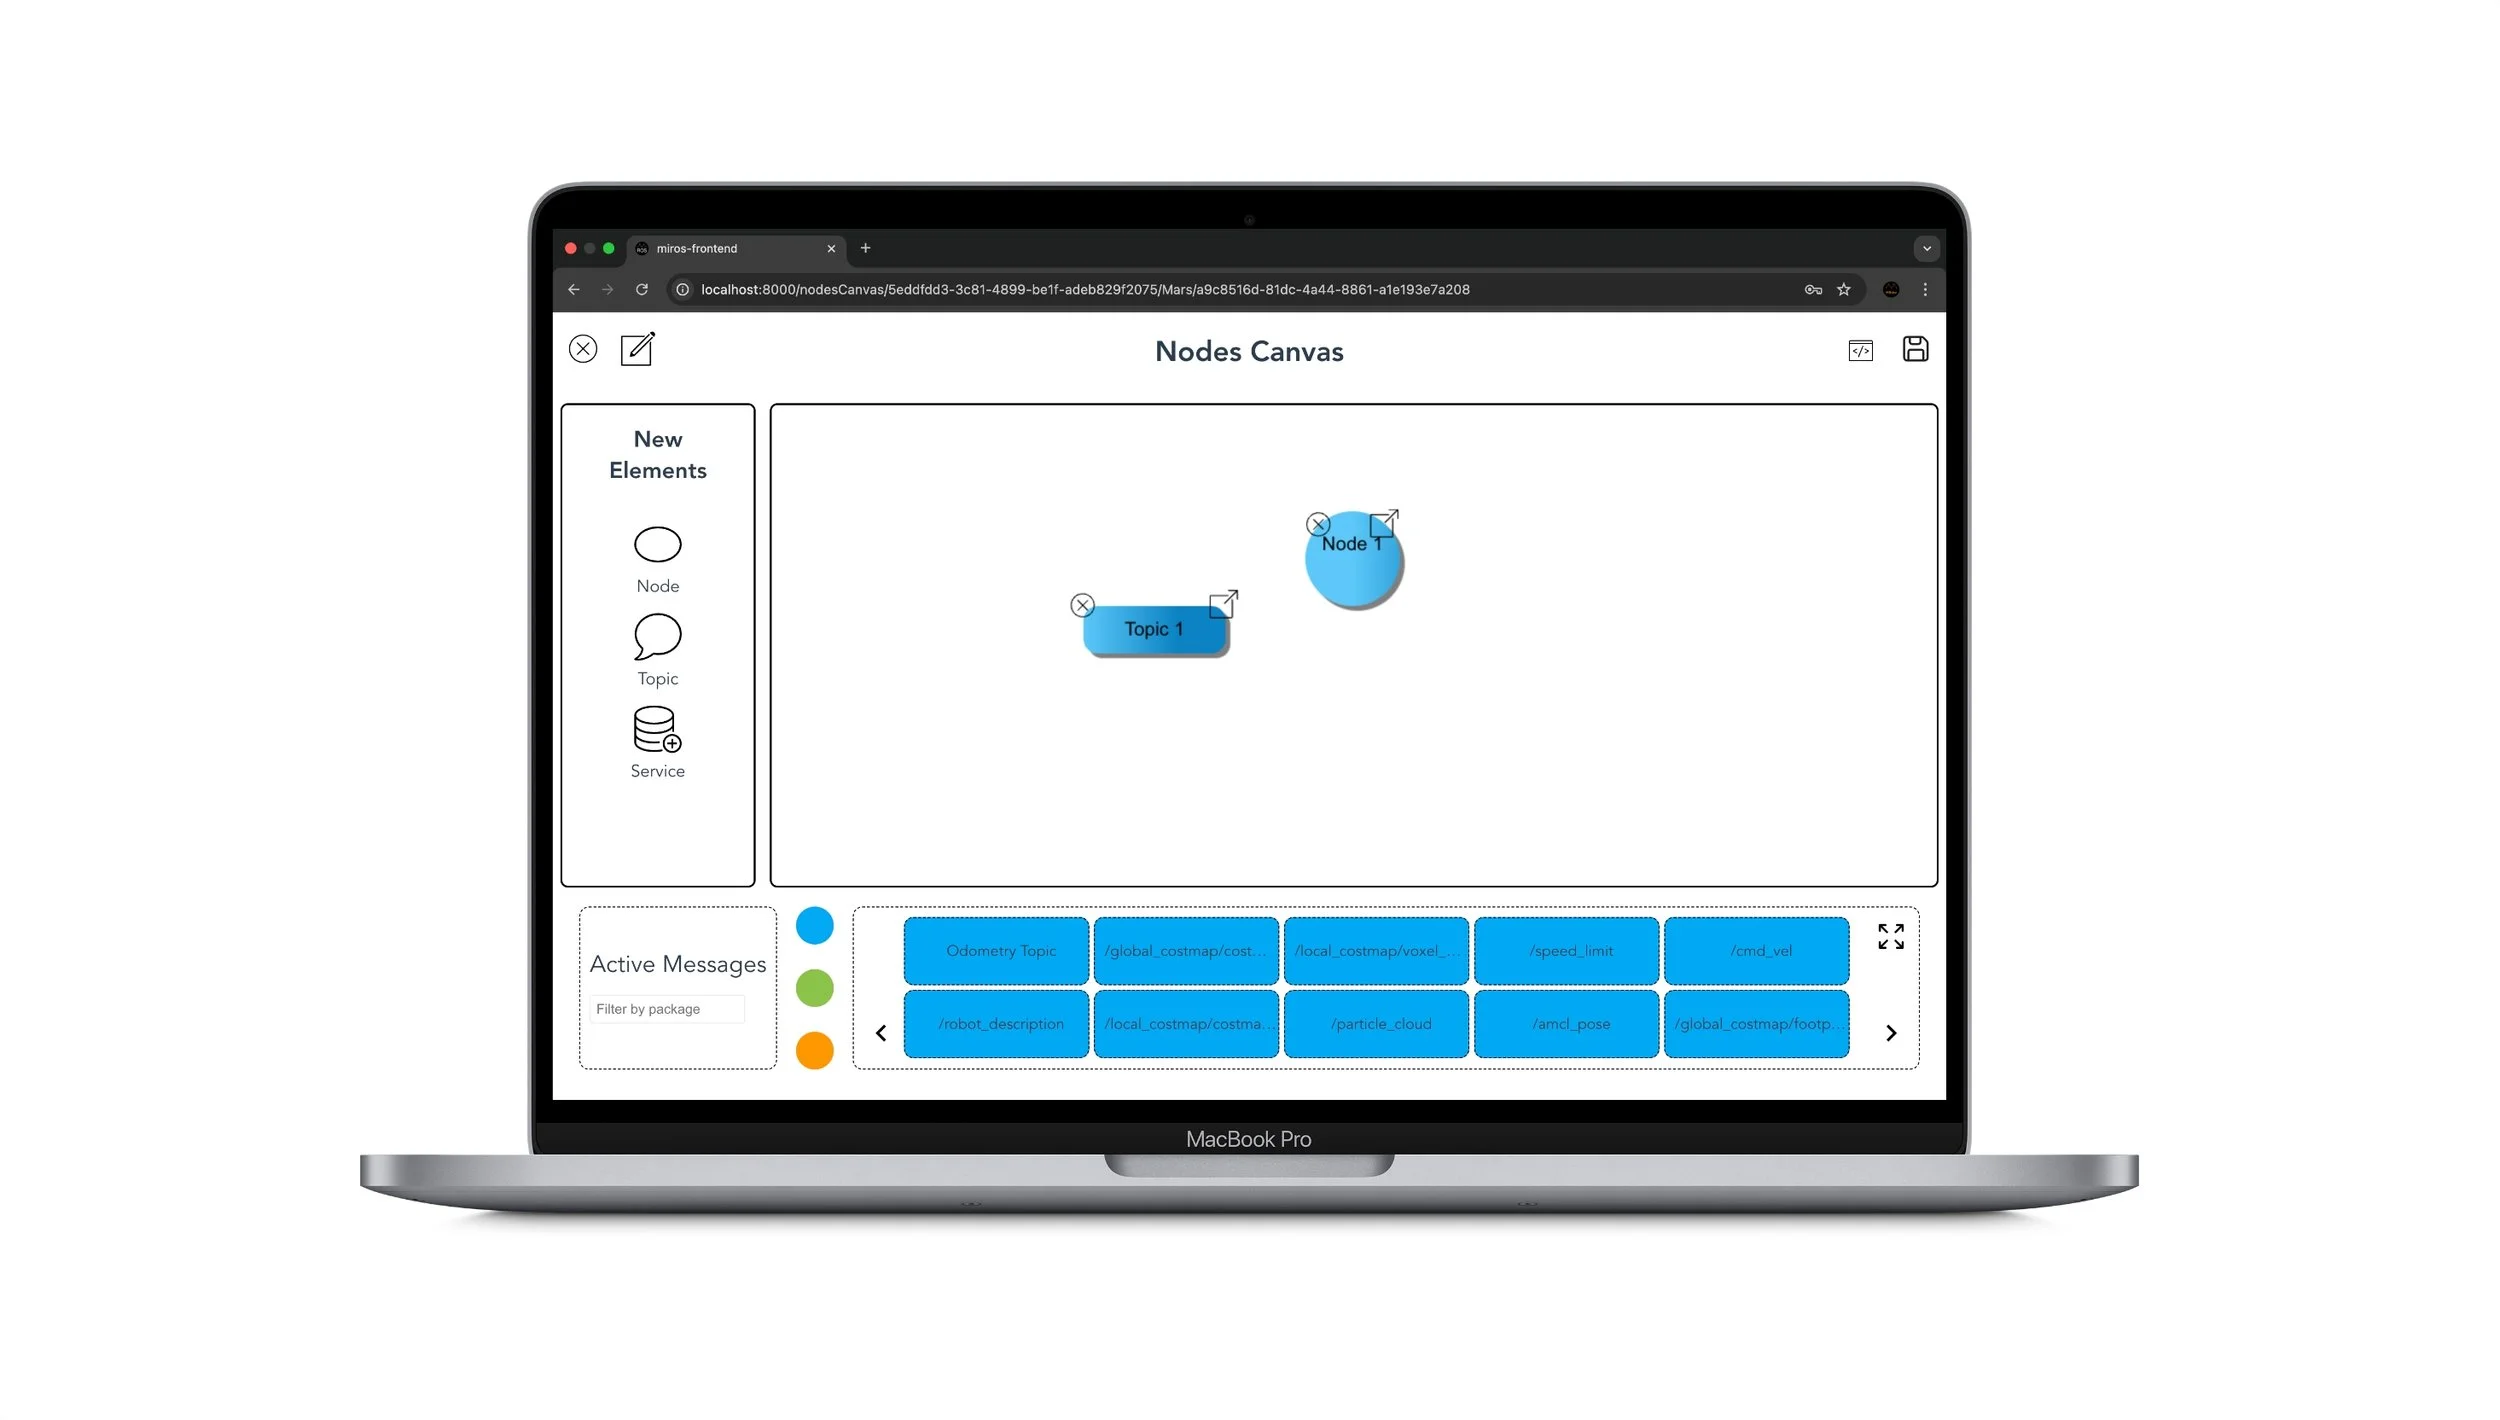
Step 2: Drag a Node and a Topic from the Side Bar
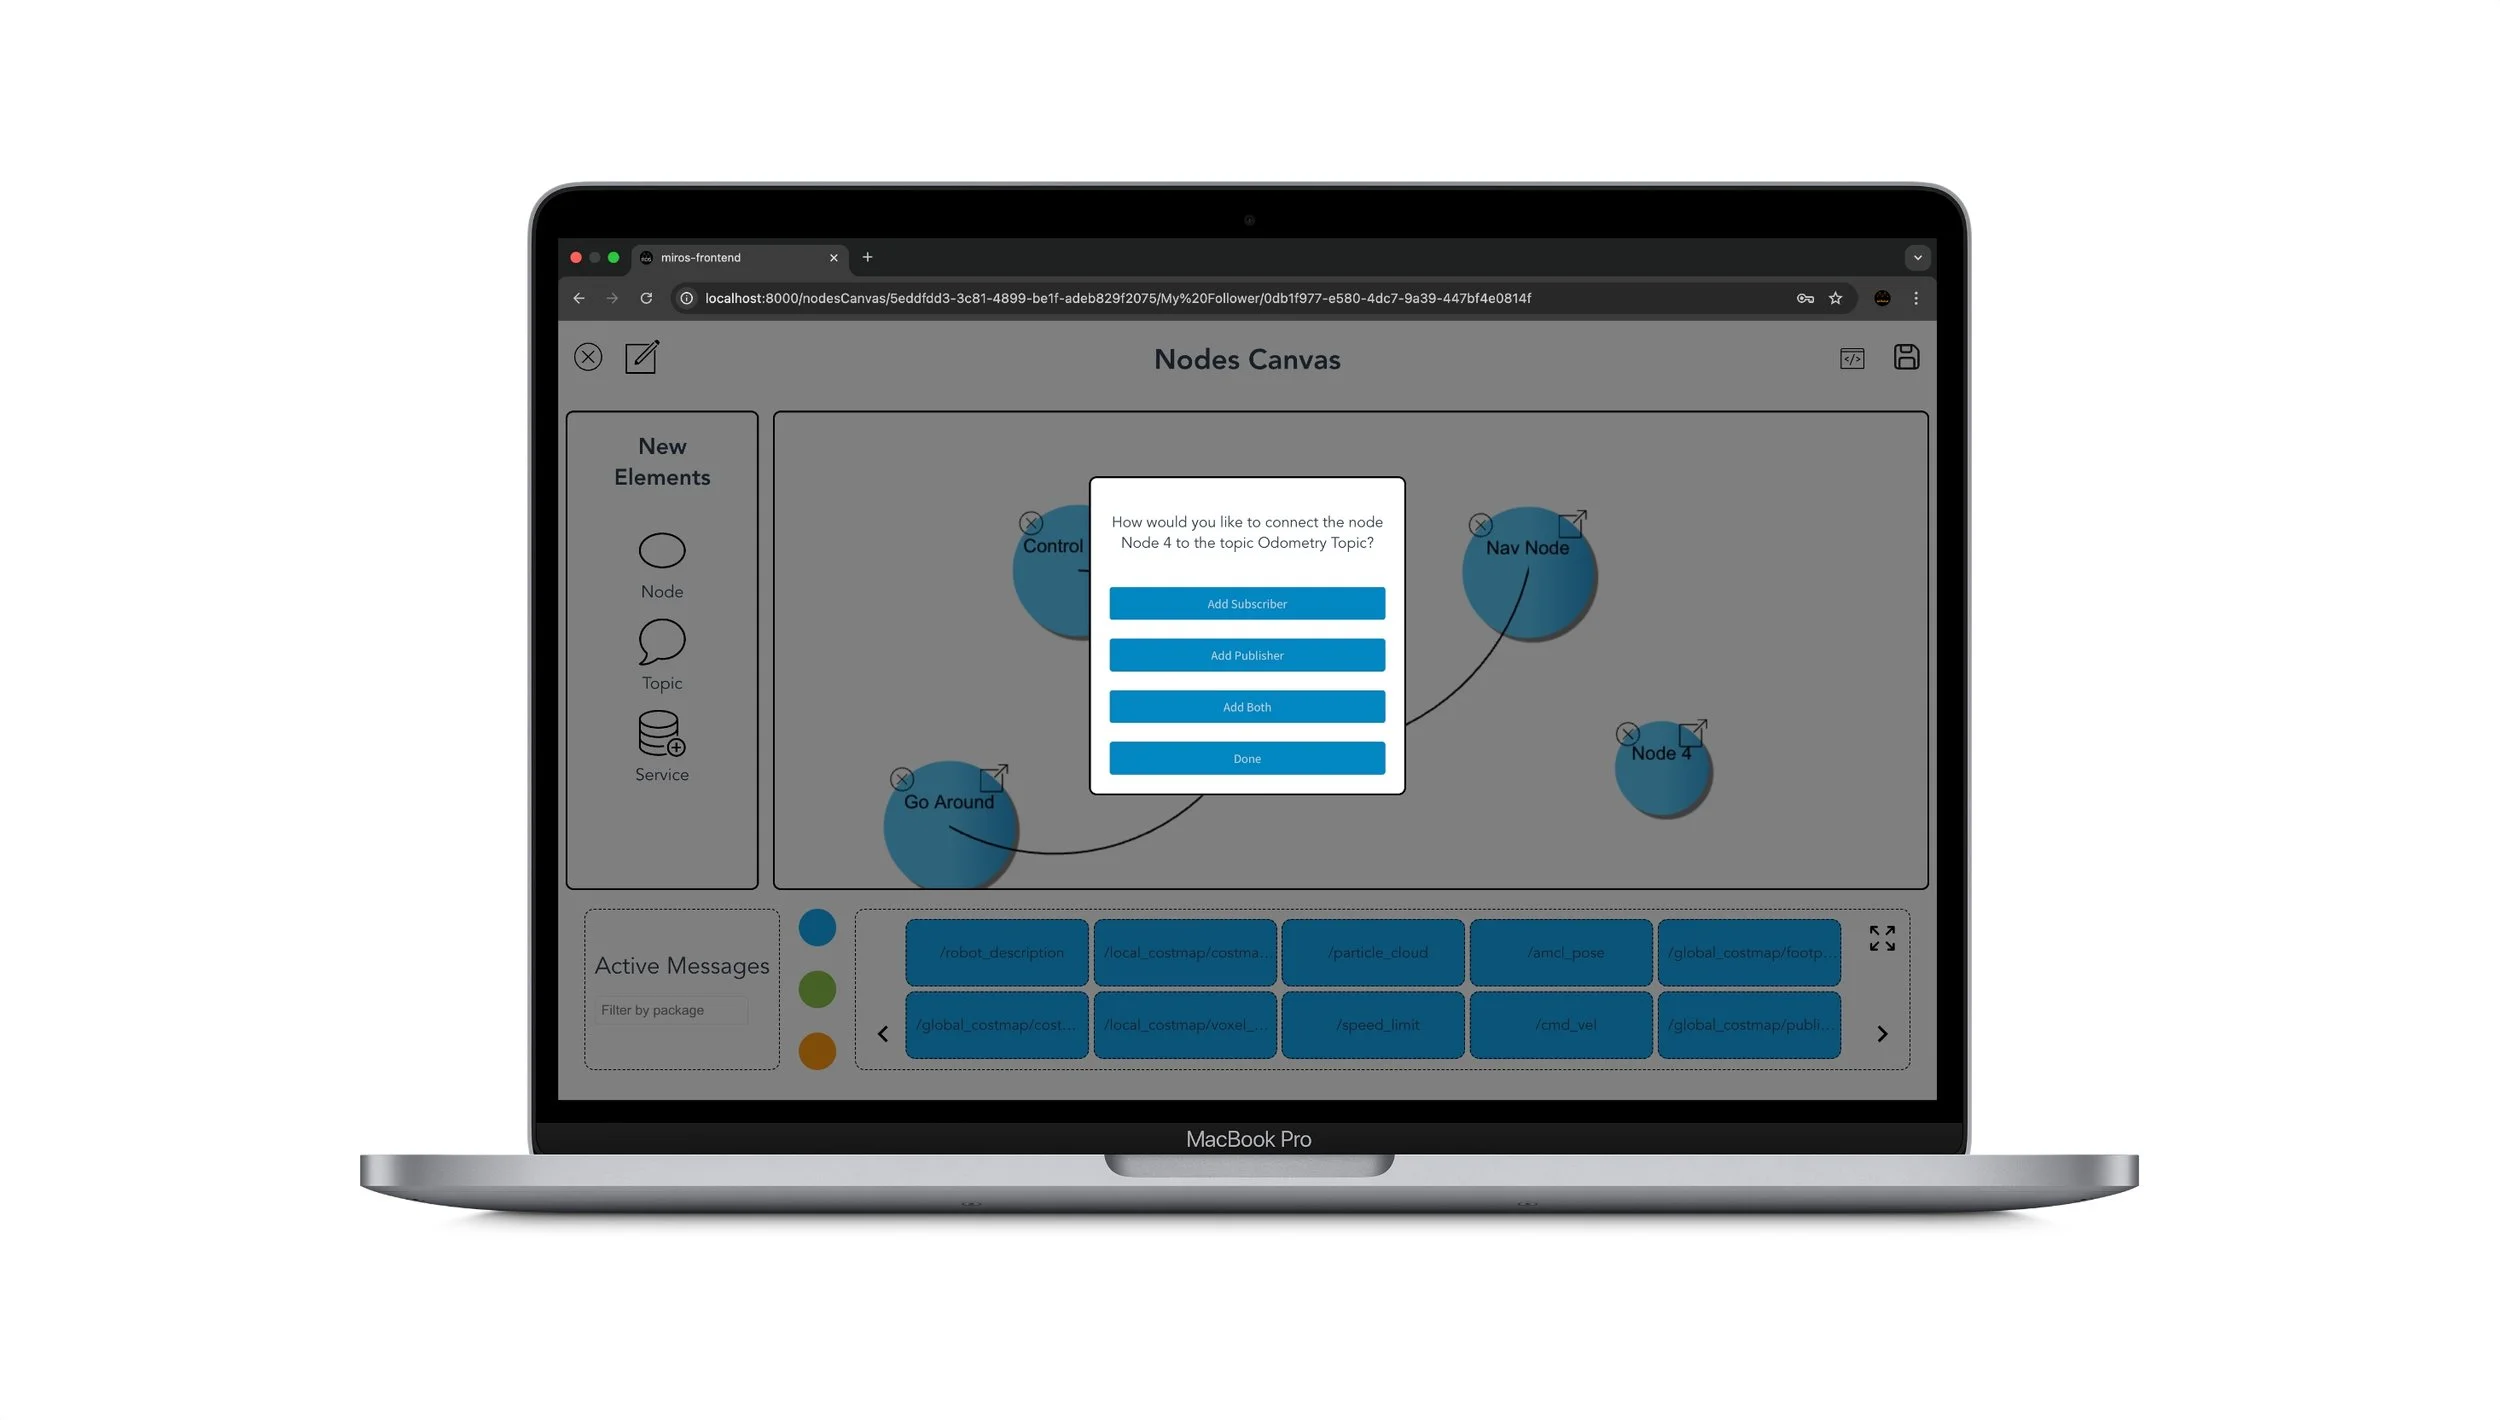
Step 3: Drag the arrow between a Node and a Topic to create a Publisher or a Subscriber
-
For more in-depth tutorials and to learn about more advanced aspects of ROS, refer to the documentation at: https://docs.ros.org/en/humble/Tutorials.html